ReplixFax C# SOAP API Tutorial
Using the ReplixFax Cloud Service to send faxes is straightforward. All you need is a valid username and password, a destination fax number and a document to be sent as the fax. This tutorial describes the steps to create a C# application in Visual Studio that sends a fax using the ReplixFax SOAP API.
You can Download the completed tutorial or follow the steps below.
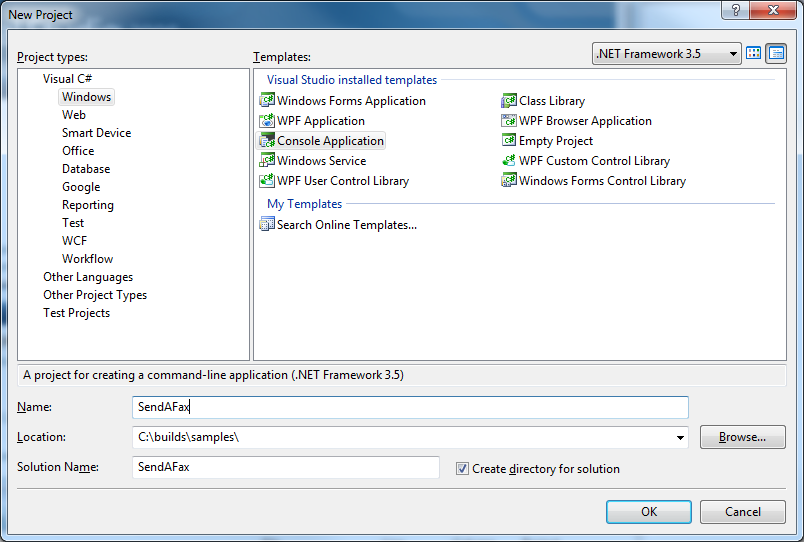
Create a Visual Studio Console Application.
This tutorial uses Visual Studio 2008, however the code and concepts are applicable to later Visual Studio versions.

Select Visual C#/Windows/Console project. Name it SendAFax.
Add a Web Service Reference
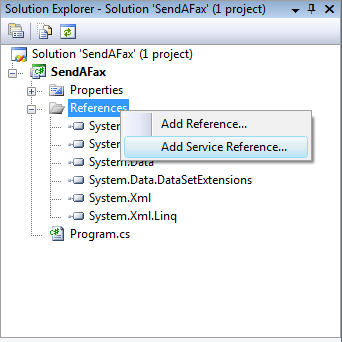
In the Solution Explorer, right mouse select the References folder and then select “Add Service Reference…”

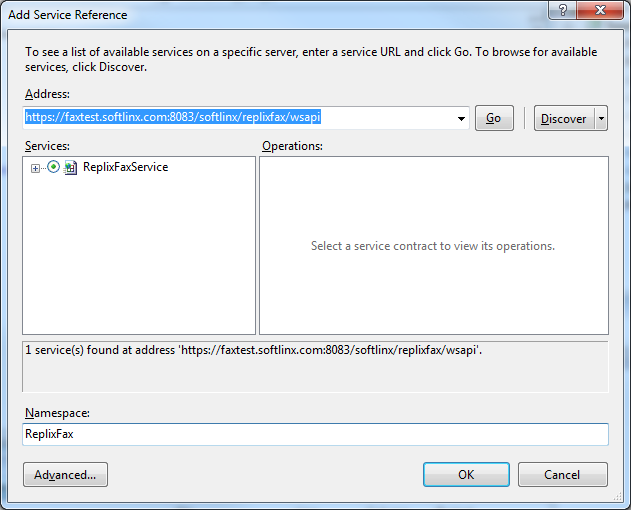
Enter https://api.rpxtest.com/softlinx/replixfax/wsapi in the Address field. Then press “Go”. Change the Namespace to be “ReplixFax”. Then click “OK”.
Visual Studio will create wrapper classes for the ReplixFax Web Services.

Helper functions and imports
Before we start using the wrapper classes, we need a helper function that will be used when specifying the password. Add the following "using" statements and function to the Program.cs file:
using System;
using System.Collections.Generic;
using System.Linq;
using System.Text;
using SendAFax.ReplixFax;
using System.ServiceModel;
using System.IO;

namespace SendAFax
{
    class Program
    {
        static void Main(string[] args)
        {
        }
        static string EncodeTo64(string toEncode)
        {
            byte[] toEncodeAsBytes= System.Text.ASCIIEncoding.ASCII.GetBytes(toEncode);
            string returnValue = System.Convert.ToBase64String(toEncodeAsBytes);
            return returnValue;

        }
    }
}
Create a ReplixFaxPortClient object and set its credentials.
Now we can create a ReplixFaxPortClient.
static void Main(string[] args)
{
    System.ServiceModel.BasicHttpBinding bind = new System.ServiceModel.BasicHttpBinding();
    bind.Security.Mode = System.ServiceModel.BasicHttpSecurityMode.Transport;
    bind.Security.Transport.ClientCredentialType = System.ServiceModel.HttpClientCredentialType.Basic;
    bind.MessageEncoding = WSMessageEncoding.Mtom;
    bind.MaxReceivedMessageSize = 104857600;
    bind.BypassProxyOnLocal = true;
    bind.HostNameComparisonMode = HostNameComparisonMode.Exact;
    bind.Security.Transport.ProxyCredentialType = HttpProxyCredentialType.Basic;

    ReplixFaxPortClient client = new ReplixFaxPortClient(bind,
             new System.ServiceModel.EndpointAddress("https://faxtest.softlinx.com/softlinx/replixfax/wsapi"));
    client.ClientCredentials.UserName.UserName = "anonymous";
}
You can change the EndpointAddress after testing to point to production: https://api.rpxfax.com/softlinx/replixfax/wsapi
Since we are NOT using basic authentication, client.ClientCredentials.UserName.UserName is set to “anonymous”. We will be passing the real username and password inside the SOAP message.
Now create a new Authentication object and set the username and password. We will be using the helper function added in a previous step to encode the password. You should replace <organization name>, <username> and <password> with your credentials.
Authentication auth =  new Authentication();
auth.Login = "<username>";
auth.Password = EncodeTo64("<password>");
auth.PasswordSecurity = "base64";
auth.Realm = "<organization>";
Create a SendFaxInput object
When making any ReplixFax web service call, you must pass a corresponding input object. Since we are going to send a fax, we need to create a SendFaxInput object and set its Authentication to the Authentication object created in the previous step.
SendFaxInput input = new SendFaxInput();
input.Authentication = auth;
Now set the recipient. You can have a list of recipients, but for this tutorial, we will have a single recipient. Also each recipient can have attributes set, such ad company and title. These attributes are only used if a ReplixFax coverpage template is being used. Since we are not using a cover page, then all we need is the fax number for the recipient.
FaxRecipient[] recipients = new FaxRecipient[1];
recipients[0] = new FaxRecipient();
recipients[0].FaxNumber="<fax number>"; // example: 15556667777

input.FaxRecipient = recipients;
Once the recipient is specified, you should add the attachment. You can have a list of attachments, but for the tutorial we will only have one file. The order you specify the attachments dictates the page order of the fax. So if you had your own cover page, you could specify that file as the first attachment and have a second attachment as the remainder of the fax.
Attachment[] attachments= new Attachment[1];
attachments[0] = new Attachment();
attachments[0].FileName="<filename>";
attachments[0].AttachmentContent = File.ReadAllBytes(@"<path to file>");

input.Attachment = attachments;
Make a SendFax Request
To send the fax request to the server, call SendFax and pass in the SendFaxInput object. As mentioned before all ReplixFax service calls require a corresponding input object. They also return a corresponding output object. In this case, SendFaxOutput.
SendFaxOutput output= client.SendFax(input);
The SendFaxOutput object will contain a status code and optional message. It will also contain the fax job IDs created. There will be a fax job id for each recipient. Since we only specified a single recipient, we only have one fax job id.
Console.Out.WriteLine("StatusCode = " + output.RequestStatus.StatusCode);
Console.Out.WriteLine("Message= " + output.RequestStatus.StatusText);

Console.Out.WriteLine("FaxId= " + output.FaxInfo[0].FaxId);
Check the status of the outgoing Fax
When a fax request is made, it must be processed by the system and then it is scheduled to be faxed. The system processing includes converting all document files to tiff and generating cover pages if a ReplixFax template cover page is being used. When a fax is ready to be sent, potentially the recipient fax machine (or server) is busy and does not have any open lines. Therefore it is difficult to determine when a fax will be successfully sent and received by the recipient fax machine or server.
In order to check the status of a fax, you need to query the system. Look at the Query Sent Faxes sample to see how to do this.
Next steps
The C# samples show how to perform other common Fax tasks. If you have questions about this tutorial or other API related items, contact Softlinx support.